In my last article I described the process for removing your aircraft’s wheels and re-greasing the bearings. In this installment I’ll go through the process of checking and replacing the brake pads.
If you’re working on a certified aircraft refer to the correct pages from the maintenance manual before you get started. There’s a very useful link on the Rapco brake parts web page. This will tell you what parts to order to match your wheels and brakes so you have everything you need for the job:
https://www.rapcoinc.com/brake_linings.asp
Rapco parts can be substituted for other manufacturers’ brake parts and they’ll likely be a bit cheaper. The part numbers are similar and there is a cross reference table on the Rapco website that shows the brake and rivet part numbers for your brake and wheel assemblies. Kadex and Aircraft Spruce will most likely carry what you need.
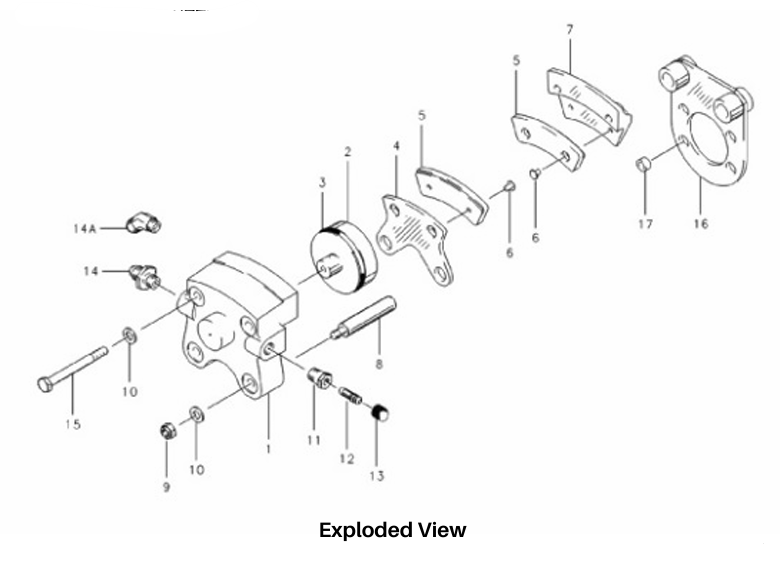
I have Cleveland wheels on my plane and, as with many disc brake assemblies, in order to take the wheel off it’s necessary to separate the pads from the brake calipers. With all that dismantled it’s a perfect time to check the brake pads, and if required, to replace them.
Start first by checking the brake discs for any scoring or other obvious damage. If you want to see a quick overview of the disassembly and inspection process, this video shows most of it:
The one comment I have is to use very little anti-seize compound. It’ll be bad if any ever gets on the brake pads.
In the automotive world disc brake pads come already bonded to the metal backing plate ready to install. In our world, the pads are riveted to the backing plate, and can thus be removed and replaced. You simply drill or push out the old rivets, and rivet on the new pads with a brake rivet tool. The riveting tool costs about $90 at Aircraft Spruce. Every AME likely has one or two in their tool box and you might be able to save yourself a bit of money if you can borrow one.
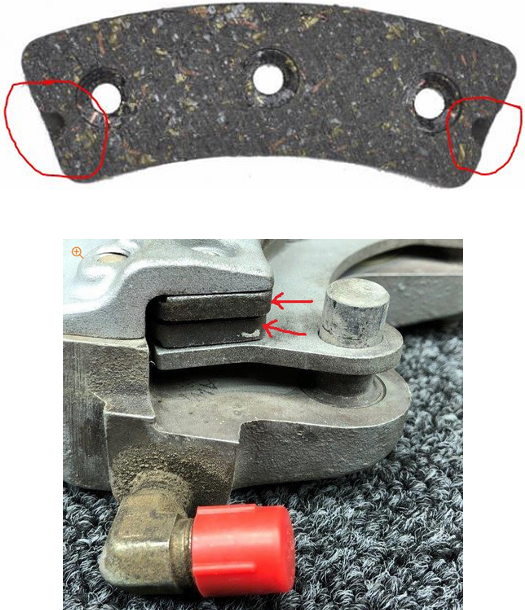
The wear indicators on Cleveland pads are notches cut into the pads that are visible with the brake assembled on the plane. If you don’t see the notch, the pads need replacing.
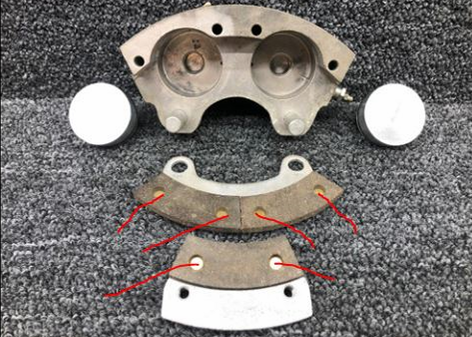
The pictures below show the pads, a typical brake assembly with the pads at the red arrows, and the disassembled caliper. The red lines indicate the rivets that will be driven out and replaced with the new pads.
Let’s look at swapping pads.
First, use the smaller head in the rivet tool that will push the back side of the rivet out of the hole. The pads will come off easily. Before you put the new pads on, use brake cleaner and shop cloths to clean everything thoroughly. Keep any brake cleaner well away from the brake caliper piston to avoid contaminating the O-ring seal. Change the head in the rivet tool and press the new rivets into place with the new pads.
The piston in the caliper has advanced outward in its hole as the brakes have worn down over time. Thus, it needs to be pressed back into the hole so the new pads will be separated enough for the rotor disc to fit between them. Compress the piston back into the caliper with a C clamp. Use a piece of shim or cardboard to protect the face of the piston.
When squeezing the piston back into the caliper, I like to use a wrench to loosen the bleed screw slightly. As the piston compresses, the extra brake fluid will seep from the bleed screw. While you can compress the piston and just let the oil go back into the brakes, you risk pushing dirty fluid into the brake system or overflowing the reservoir. Be careful not to get air into the brake lines so you won’t have to bleed the brakes afterwards.
Now you’re ready to put the wheels back on the axles and reassemble the brakes. This is the point where you want to sparingly apply anti-seize to the caliper slide pins. Some brake calipers use bolts with drilled heads which will need to be safety wired. If you don’t have drilled heads then you need to correctly torque the bolts.
If you can’t find the correct torque value then use 75 inch pounds. Spin the wheel to make sure nothing is hung up and that the calipers move freely. Secure the wheel with its nut and a new cotter pin, and you’re done.
This short guide assumes that you didn’t find any problems with your brakes. If you have a worn hose, leaky O-rings at the pistons, or any contamination of the parts, then more work is required. You may need to do more than just replace the pads, bleed the brake lines, or deal with scored discs.
You can’t ignore these problems and if you aren’t familiar with these repairs then now is a good time to seek experienced and/or professional advice or help. This is especially true with a certified plane.
Properly operating wheels and brakes are crucial parts of our planes. Ensuring that they’re working correctly is straightforward and pretty easy to do. I encourage you to take the time to inspect and maintain them regularly, and seek help if you need to.