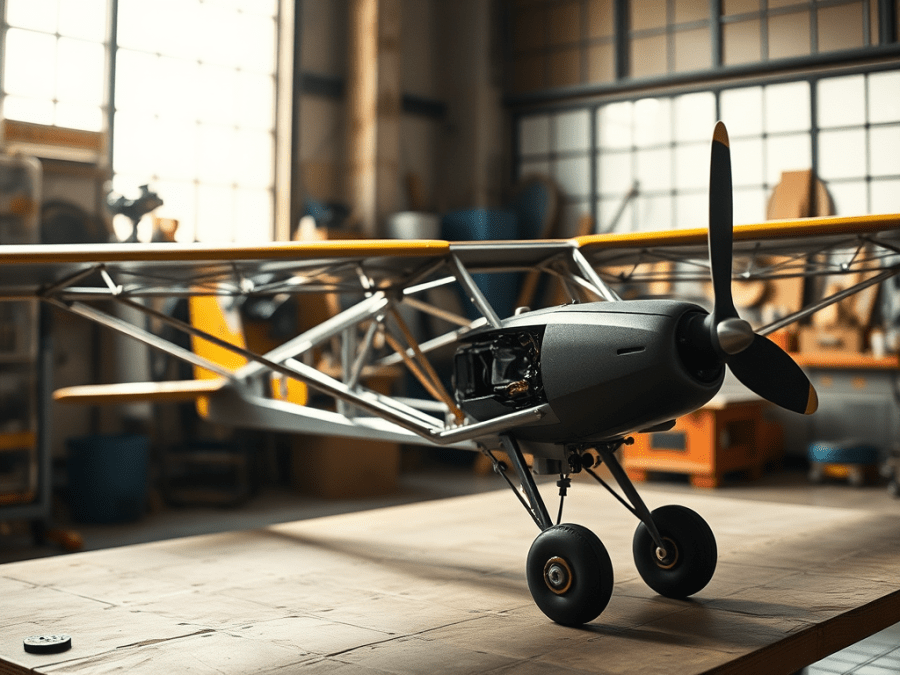
At the beginning of August last year (2015) I received my Carbon Cub EX2 kit. The revised version of the EX-kit that Cub Crafters designed. Not a lot different, just a few things to improve the aircraft and make a good marketing strategy in my opinion. New aileron hinge location with a counterbalance, new flap pivot point and new jack screw for more down trim to name a few.
Released at Sun N Fun 2015, it was kit Number 8 that shipped to me. Knowing that Cub Crafters was also a certified plant for the Top Cub and Light Sport Carbon cub, I figured I was getting the best, most organized kit I was yet to build. Boy was I wrong; I was missing many parts and had too many parts and hardware items of lots of different items.
Sure, hope I build this thing right with all the extra parts I have;-) It was the most trying project of the 5 planes I built. The end product is amazing, but it was a challenge to finish if you are a fast builder and plan a schedule. Now Cub crafters really stepped up to the plate and got me many items that stopped me on Fed EX overnight, something that they did not have to do. Basically, the new kit was not really ready to ship, but they shipped anyway. I think they really regretted that move. Even the smallest changes to a kit can make a long list of part changes and manual discrepancies.

Along with the joy of the kit issues I had the trouble with the paint. A two-month process that finally had Stewarts Systems agree with me that the paint cans were contaminating the paint. Again, they really stepped up and got me looked after. The non contaminated paint was trouble free after that was resolved. This building airplanes is more stressful than work.
I plugged along every evening and weekend spending around 30hrs a week on the project. I am not one to sit around. When my mind is to finish a project, I start it to finish it in a timely manner. This one took 10.5 months, and I spent around 1000hrs on it.
The kit quality is amazing. All parts are CNC and all the carbon fibre work is first class. A quick scuff and it is ready for painting. No pin holes on anything. They kit is very complete and that I think is what makes the kit more challenging for Cub Crafters. It is supposed to be 100% complete; if I was missing anything I had them ship it to me. In the end I went to Aircraft Spruce for some small items just to add back to my stock of hardware.
I had planned to really coast to the finish line but learned that the peer inspector was leaving on Vacation, and it would take longer to get my flight authority back. I pushed to the end cutting out a week of planned work to get the final inspection done. It went well with no snags and the paperwork quickly got reviewed for final returned to me.

I then spent several days getting the close out panels on, many eyes to scan the airplane for issues and many goings over by myself to make sure the plane was ready. After that was done I had to make sure I was ready. First, I needed sleep. Getting up at 4:30 am, working on it before work and then again at night really wore me out. A good rest and I jumped in the ten for some test flight practice.
Fortunately, I am current, not just paper wise, but I fly once or more a week. Even during the build. It wasn’t about being ready as to how to fly but the right mind set for a test flight. Winds had been really high lately. Last flight in the ten surface winds peaked at 37kts and I was lucky enough to be flying that day. It keeps your skills sharp. The night of the test flight was not planned to be the test flight. I made sure the plane was ready; the wind was high, and I decided to fly the ten like I was doing a test flight. Tried out the air on each runway for turbulence and strength of the crosswind, looked at all the places to land if the engine quit and emergency procedures. I came back after that quick flight, and I felt totally ready.
I sent a quick text to a friend and asked if he could come by as I MAY fly the cub. This was the third start of the engine, and I taxied over to the pumps. Added half fuel and we felt the wind getting stronger and stronger. The plan was a tail up run, if it felt good and was not squirrely, I would likely go. Maybe!
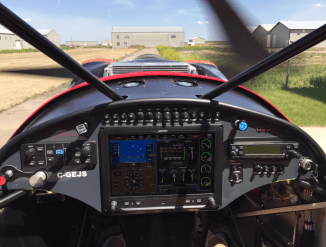
Run up checks done, back tracked and turned around. Brought the throttle in, lifted the tail and then eased the power back. All was well. Turn around and lined up again. It’s time to see if I really did get it all right. Planned for a partial throttle take off, fly it at ten feet or so, if all was good, I would add power and climb. All went as planned. Got it airborne, felt it out in pitch and roll and knew if it flew at 10ft it would fly at 1000ft, so I added the rest of the power. We were climbing in complete control with little concern, no strange smells, not bad vibrations, nothing to be alarmed about. Turned down wind trimmed it out and took my hands off the stick, it stayed put which was nice to know. Only trouble was I was indicating 170 plus??? Ground speed…really close to matching??? Wow this does not look right, quickly realized the Efis was in KMH. Because it was new I only had to leak test it, but I did not look at the units close enough, I guess. One needs a bit of excitement to test your mind!
I flew a large high circuit a few times working the engine hard. Front temps were much cooler than the back, so a deflector is in order, foil tape works great. Everything else was where it should be. Slowed it down to 100 indicated and new I was with flap speed range. After that I just flew it by feel instead of worrying about numbers. As long as I was below max flap speed, I was good. Touch down with a nice cushy wheel landed and I taxied back to the hanger. I big smile, a big wahoo! The project is officially an airplane!!
I have been flying the airplane as often as weather would allow. Flew it in 20kt surface winds and 30plus kt winds aloft to dead calm conditions. No issues at all, it handles well. Most of the first 15hours of flying has been high powered flight getting the engine broke in. After the first oil drop at ten hours, I did more flight testing. I seem to be able to get airborne similar to the SuperStol, I get the tail up and then suck the stick back while applying full flaps. Landing is done tail low with heavy breaking. The tail is lighter so you can’t hammer the brakes quite as hard. You also have to have a bit more finesse as I will not drop it in, you will bounce and lengthen your roll. Vis is great over the nose through the entire landing phase. It is easy to either wheel land or 3 point. If it is windy I go half flaps and wheel land it on.
Max speed is about 140pmh TAS at 5500 with the 31” bush wheels and stalls around 30mph IAS. It will just redline the engine in level flight, so it is a perfect set up for prop and engine. It is quite the range. Cruise is 100mph indicated or close to 110mph TAS at 52% power burning 6.5 gph. With 44 gal on board, it will stay aloft for quite a while. I did many flights close to 4 hours aloft and still had plenty of fuel in the tank. It is not near as comfortable as the RV10 for these kinds of legs though. I think 3 hrs. is about max before needing a stretch on the ground.
I was fortunate that the plane had zero issues to take me away from flying it. I gained confidence in it quickly and this allowed me to pile on the testing hours in short order. It took a total of 12 days to get the time flown off. Loaded up it fly’s the same once in cruise. Take off roll is lengthened but I just let it fly off when heavy. It just seem so rise on its own when it is ready to fly.
I would get up before 5am and be in the air before 6:30 everyday that was flyable. It took 10.5 months to build and 2 weeks to fly the 25hrs. I consider it another worthy accomplishment. This plane is going to be loads of fun and a great compliment to the traveling RV10.
