
I love technology, and I really love applying it to my flying. Things like GPS, digital devices in the cockpit, cameras and autopilots really add to my flying experience and safety. So it’s only natural that I’d migrate to using technology when I’m planning to fly.
Aside from Nav Canada’s excellent Aviation Weather Website, a number of other flight planning resources have become available on the Internet. I’ll take a look at the four that I use regularly and offer some tips and tricks that I’ve learned. The best part of these resources is that they’re absolutely free once you have an Internet connection.
These are the four web services that I’ll examine:
• Google Earth & Google Maps
• SkyVector.com
• FltPlan.com
• 100LL.ca
Interestingly, none of these services is what I would call perfectly ideal for flight planning. Each has its particular shortcomings and advantages. I use the respective features of each site to get all the information I need very quickly and efficiently. At no time in my digital flight planning do I pick up a paper map anymore, either. Of course I carry and use them in the cockpit, but I don’t use them for planning.
One thing to note is that I use Google Chrome as my Internet browser so unless otherwise stated all of my reviews were done with it.
Let’s start with the Google products. While Google Earth & Google Maps are not flight planning resources, per se, they offer remarkable features that lend themselves well to flight planning, especially Google Earth.
Google Earth requires a download to your computer and I have the icon placed on my desktop. GE is simply phenomenal in the amount of information it offers. It shows all manner of terrain features, roads, buildings, businesses and so much more.
As a sample route, I’ll plan a flight from Chestermere-Kirkby Field east of Calgary, to Golden, BC, along the Trans Canada Highway.
The first flight planning feature to highlight is the ruler. Zoom in with your mouse wheel or the sliding scale on the right side of the screen. At the top of the screen click the icon that looks like a small vertical ruler. An option box appears that let’s you choose Line, Path or Pro. Choose Path and then select the units you want to use. In this case I’ll use nautical miles.
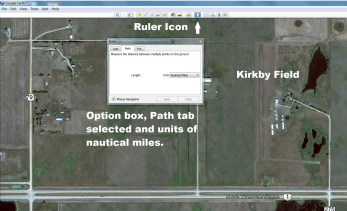
I would normally fly south of Calgary International’s controlled airspace starting with a leg to the prominent landmark of the intersection of Highway 22X and Stoney Trail. Let’s find out how far away that is. Of course GE doesn’t offer information on the heights or floors of any airspace, but right now we’re more concerned with distance.
Zoom out a bit, put the cursor crosshairs on Kirkby Field and hit the left mouse button. Move the mouse now to the next waypoint of the route, in this case the intersection of Stoney Trail and 22X. If you make a mistake and add in a segment in error, just hit the right mouse button to erase the last segment you drew.
Your screen should look something like this.
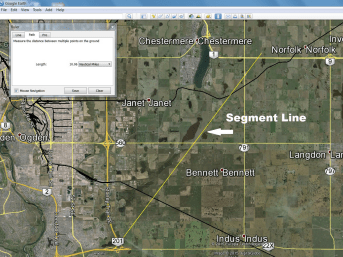
You see the distance to the waypoint is about 10 nm. If you keep adding subsequent waypoints you learn the total distance to Golden is about 150 nm as we make our way to Scott Lake Hill and then follow the Trans Canada Highway. Using GE you can find the entire route length in seconds.
Another fantastic feature of Google Earth is 3D terrain viewing. Let’s say we’ve never been to Golden and never traversed the Kicking Horse Pass in an airplane. What does it actually look like? Here’s how to answer that question.
Click and drag the world westbound until you’re at a little spot called Stephen, on Highway 1 between Lake Louise and Field, BC. You can see the Alberta – BC border as a white line to the east of Stephen. Look to the top right corner of the screen now to find a compass circle with an ‘N’ on it. Click this ‘N’ to automatically orient the view to north being straight up.
Now let’s orient our view to the west. With the mouse over the compass circle press and hold the arrow head on the left, or west, of the compass. The entire view now re-orients to west being at the top of the screen. Press and hold down the mouse wheel while also dragging the cursor to the bottom of the screen. Your viewing angle changes from straight vertical to almost horizontal depending on how far down you pull the mouse. Still holding the mouse wheel down, you can move the cursor side-to-side to rotate around the point where your view is situated. Use your mouse wheel to zoom in or out as you please.
Your screen should look something like this.

Looking now at the bottom right corner, we see a whole bunch of other treasured information. It shows the date the image was captured and the lat/long data of where the cursor is situated on the image. Perhaps most important is the elevation of the terrain above sea level at any point where you place the cursor, and the altitude from which the view is occurring.
Now drag the image in any direction you want, and you can essentially ‘fly’ anywhere you want to go. This feature can really help remove the unknown and the uncertainty of flying over places and terrain where you’ve never been before.
Oh, and as an interesting aside, Google Earth actually offers a flight simulator mode that you can access through the drop down Tools menu at the top of the screen.
Google Maps isn’t as useful for flight planning but it does have some valuable features. It’s available via simple website access and offers views in either map, terrain, or satellite perspective. The terrain mode view gives very good perspectives of hills, slopes and mountains, and provides elevation contour lines, too. Maps, like Earth, also features places like hotels, car rentals, restaurants, and the Street View option, which is invaluable.
As with any program, simply playing with Google Earth will likely be your best teacher. Use the Help tab and other on-line resources to best learn about all the features GE offers. After some very short time using it, though, I’m certain you’ll see its incredible value as a flight planning tool.
Next month we’ll examine SkyVector, perhaps the best of the free on-line flight planning tools.
