
Since I bought my Zenair CH250 a few years ago I’ve done a number of repair and upgrade projects. I’ve decided to write about a few of them to help out those that may have to do the same thing. This article is replacing O-rings in your brake cylinders to get rid of those oil leaks that stain the floor of your plane.
Aircraft brakes are a bit different than the brakes in your car. Some of these differences are:
- Aircraft do not use DOT brake fluid but instead use hydraulic fluid which is red in color. A common spec is MIL-H-5606G. Auto brake fluid isn’t compatible with the O-rings.
- Aircraft brakes are normally filled from the bottom because master cylinders are mounted vertically and not horizontally.
- Aircraft brakes won’t have vacuum power assist or electronic antilock mechanisms.
In my plane I had Cleveland brakes and master cylinders. The installation consists of a single reservoir in the engine compartment with a T fitting to the two brake master cylinders. Those feed with rubber hoses and copper lines to the brakes on each main gear. The problem I was having is that the O-rings that sealed the master cylinders were leaking and every month or so I ended up wiping up oil stains. The solution was to pull the guts out of the master cylinder, replace the O-rings, bleed the brakes and go flying.
First, there are a number of different models of brakes, and each requires different parts. I was lucky in that there was a label still attached that hadn’t been detached by leaky oil. From that I determined that my model was a 10-24C. My first action was to go to the AircraftSpruce.ca website and find a suitable rebuild kit. Unfortunately, I have a model that’s not on their list. Next was a Google search for Cleveland Master Cylinder and that turned up a PDF of the Cleveland parts manual. Although there wasn’t a specific rebuild kit for my model they did indicate the four sizes of O-rings required to do my repair. These had MS28755-nnn numbers and a search of those on the Aircraft Spruce website quickly found what I needed. For the cost of a couple of coffees I had what I needed mailed out to me and within a week had the O-rings wrapped in individual paper wrappers. If you can’t determine your model of brakes, then your best bet is to disassemble the brakes and measure the O-rings with calipers. In addition to diameter the thickness is also important. Find a MS28755-nnn part number that matches those dimensions and you’re in business. You might be able to find these parts at a hydraulic or industrial supply store but make sure they are compatible with hydraulic fluid and match all the dimensions. “Sort of close” isn’t going to work in this situation.
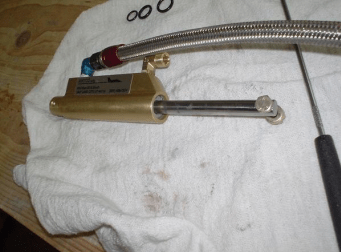
First, disconnect the brake lines near the wheels and let all the fluid drain out of the system. If you don’t do this, any fluid in the brake system or reservoirs will pour all over the floor when you take everything apart. Getting the brakes apart was simple once I was able to crawl in under the dash. First, I made sure to wipe everything down and make sure there was no dirt or contaminants anywhere before I started taking things apart. Using snap ring pliers, it was a fairly easy task to remove the top retainer ring. Then remove the pushrod from the rudder pedal and with a fairly substantial pull the inner guts came out in one piece. Since your brakes are installed with both hoses and castle nuts you might find it’s more work to remove the whole assembly than it is to just pull the piston assembly out and leave everything else in place.
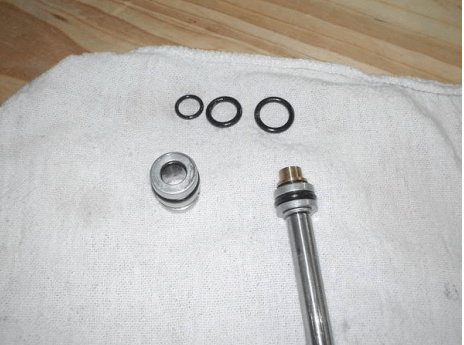
On the bench it was a simple case of removing a single snap ring to take the three pieces apart and get at the four O-rings that needed to be replaced. Again, make sure your work area is perfectly clean; a small amount of dirt can ruin a hydraulic system. Using dental picks carefully pry out the O-rings being careful not to scratch or damage the metal parts. Using a tiny amount of brake fluid lubricate the new O-rings and slip them back into place. Reassemble the piston assembly, insert in the airplane and replace the snap ring. Cleveland brakes have an adjustable spring between the brake pedal and piston. Make sure you have enough spring pressure to pull the pedal all the way up. You won’t be able to fill the brakes unless the pistons are all the way to the top.
Once everything is together then you‟re going to fill the system from the bottom by pushing fluid into the brake bleeder at the wheels. Since the master cylinders are vertical air will sit at the top of the piston assembly and cannot be pushed down out of the system. The standard method you use in your car won‟t work in your airplane. Put a rubber hose into the brake reservoir so once it fills it will run out the hose and not into the plane. This will also help you tell when the system is full.
There are a few ways to pump oil into the system. If you are by yourself then an IV bag setup that is hung higher than the brake reservoir will fill the system, although very slowly. Option 2 is to use a regular oil can with a rubber hose connected to the brake bleeder. Option 3 is to spend the money for a pressurized canister with specialized fittings. This works very well but isn’t necessary if you’re only going to be doing this once or twice in your life. Google brake bleeder and you’ll see lots of different solutions to the problem. Cars and motorcycles use the same brake bleeder fitting.

Using a 1/4” wrench loosen the brake bleeder about 1/2 turn and slip the rubber hose over the end. Start pumping oil into the system until you see oil coming out the top of the brake reservoir. If you can’t push oil into the system, make sure the bleeder is loose (oil should drain out) and pull the brake pedal all the way up to allow free flow of oil. Once full tighten the bleeder and then go to the other wheel and repeat the process. You will find this takes less than a pint of oil to fill both sides. Using a syringe or other method, drain some fluid out of the reservoir leaving about 1” of room at the top. This allows expansion of hot oil once the brakes heat up. Put the cap back on the reservoir making sure that the vent isn’t clogged and then test everything out. You should easily be able to lock the brakes without bottoming the brake pedals. If you are able to bottom the brake pedals, then you have air in the system and you need to repeat the bleeder process.
Here are the details on what you need to get this job done. Plan for 3-4 hours if this is the first time doing this:
- Get the model of your master cylinder so you know which parts you’ll need to order. If you can do this before taking everything apart then you can have the new O-rings ready and do the whole project in one day.
- You will need snap ring pliers, needle-nose pliers, dental picks, lots of paper towels, small wrench for the bleeder screw, oil can, 1/8 rubber hose, oil can, brake fluid. You’ll also need some kind of rubber hose and possibly a fitting to connect to the top of the brake reservoir.
- A couple of 300-500ml pop bottles are a handy to get the oil drained out of the system. Disconnect the brake lines and let all the old oil drain into these. If the oil looks clean you can probably re-use it but you will need additional oil to top up the system.
- Since your brake pedals use castle nuts don‟t forget to put new cotter pins in after you reassemble everything
