As many of you know, I am building an RV-10. It is a four-place version of the Van’s RV series of aircraft and uses the six-cylinder Lycoming 260 HP engine. The choice was easy as I was looking for an aircraft that was fast, had a long range, and was built with sheet metal and solid rivets. Having all the tools on hand helped influence this. Most importantly, though, was being able to haul four people so I could bring the whole family along. I was really tired of leaving them behind on all the great trips I went on in the RV-9. The RV-10 solves all those issues. This is my third project and second RV. Seeing how Ken was looking for ramblings from someone new, I figured I would make some time to write about my experience thus far on the RV-10 project.

Mid-September of this year marks the first year of working on the project. I went with a quick build as I really did not want to spend more time than I had to complete the project. The other decision I made was to have no regrets and build it with everything I wished it had the first time. I feel that I have satisfied everything so far.
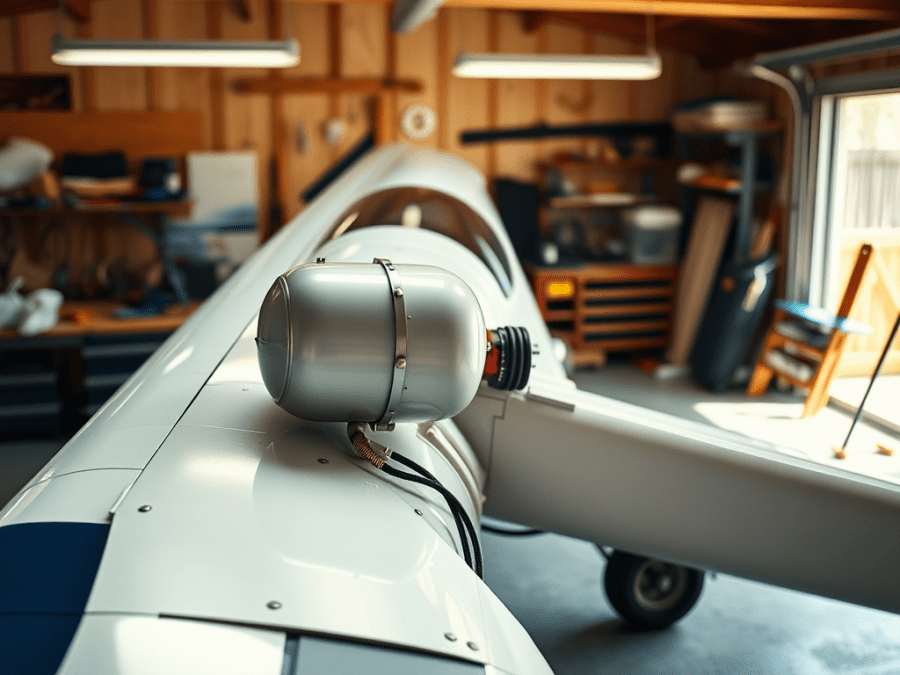
The second criteria was to have lots of fuel. I like to travel, and I wanted my bladder and the pleading of the family to land to be the limiting factor for long cross-country flights. I always wished I could have gone further in the RV-9, although Garret might not agree. I went with the HWA long-range tanks that add 15 gallons more fuel. That gives me a total of 75 US Gal, stretching out my range to nearly 1200 nautical miles (1380 Statute miles). The tanks are tubular and slide into the wing ribs and have a welded bay that fits in the wing tips. The filler cap is accessed through the wing tips.
The third criteria was to go with a glass panel complete with autopilot. This plane will be used for travel. Sitting back and monitoring the instruments is what I was looking for. Basically, I wanted a low pilot workload. With a little advice from Ken Beanlands (have to blame someone for spending so much), I built a complete dual glass IFR panel with triple redundancy. Each EFIS can run by itself, and the triple redundancy comes from the 2-¼” airspeed, altimeter, and ADI. They are all backed up with batteries, and I have an auxiliary power supply if the main feed goes down. The avionic stack has two COMM radios, two NAV receivers, two GPS units, and one transponder. A turn of a knob and the plane will climb to whatever altitude you picked and change the heading bug, and it will turn to that heading on its own. The autopilot will even fly holding patterns and fly the ILS to decision height from the Garmin GNS 430W or SL 30 NAV. Can you believe you can build this kind of aircraft in a garage? Amazing technology!!
The panel and aux tanks were the main customization items that I had planned to do. There have been lots of other items that might make a really long list. One thing leads to another, and you just keep upgrading as you go and learn about all the new stuff out there. I will take you through my journey thus far.
I committed to the RV-10 project in the summer of 2007, and the empennage kit arrived mid-September. Timing is key to keeping a project on a stable track. This kit comes in a big crate as there are so many parts to the empennage. Once I started on it, I quickly made the decision to go quick-build as I needed to get the order placed. If it all kept on track, the rest of the kit would arrive as I completed the empennage. Luck was on my side, and the empennage was completed the week the rest of the kit arrived.
December 9, 2007, was the date the remainder of the kit arrived, and I could not believe how big the crates were. I got a tilt deck to pick it up at the trucking company and bring it to my house. He tilted the deck into the garage, and we slid everything right in. The problem was that I had no place to work. I soon got all the crates opened, and things started to open up. Many parts went into the basement, under the couch, in the office, on top of the hutch, and so on. There was soon room to move around in the garage to get back to work…but no room to move in the house.
That weekend, I got the tail cone riveted and fitted to the fuselage. I now had a 19 ft airframe to make airplane noises in. Things progressed quickly, and I got the canopy and doors fabricated before the Christmas holidays were over. All the prep work inside the canopy was done before it went on the fuselage, including paint. This is a much easier way than working upside down sanding. It was then time to get ready for pre-close-up inspection. This involved getting the long-range tanks installed, as well as various other items to complete on the wings. On January 31, 2008, the inspection was complete, and the next step was getting it ready to fly; however, a couple more tasks are required for that to happen.
I got back to work on the canopy. I had to get all the windows cut and fitted. Once that was done, it was time to make the front fairing for the windscreen. I learned a bunch from my other aircraft on what to do and what not to do when fabricating with fiberglass. It turned out well, and I am happy with it. Once that was done, it was time to fill all the pinholes and imperfections in the glass work. Aeropoxy works perfectly for the gouges and transitions from aluminum to glass. The pinholes were filled with a filler primer that made the job easy.
Once the dust cleared from all the sanding and painting, I was able to get onto the panel. The panel planning started well before the canopy, as I needed to get the sub-panel cutouts done and any mounting hardware complete before installing it on the fuselage. There is nothing worse than lying on your back with an angle grinder trying to cut more holes in the sub-panel that was missed. I had also got the main panel cut prior to working on the sub-panel.
The mistake I made when building the RV-9 was buying only a few of the instruments before starting the panel. To do it right, you need most everything before you make the first cut. I measured all the instruments with calipers and drew the entire panel up in AutoCAD. I triple-checked all the work and bought a sheet of aluminum. I sent the file to the water jet guys, along with the sheet, and they zipped it out in minutes. When I brought it back home, I just slid the stuff right in. Once it was all finalized, I sent the panel to the powder coater, and they finished the parts. All the instruments went in for the last time, and the labels got placed. The panel was ready for install.
I did cheat a bit on the panel’s avionics. I had SteinAir wire all the avionics before they shipped it out. This saved me huge amounts of time as there are plenty of wires for all the equipment I have. As I mentioned before, one thing to keep in mind in all this is timing and proper planning. The instruments took over 12 weeks to get here, so you have to figure out what you wanted very early on in the game. If you don’t do that, you can easily get really held up.
Once the panel was installed for good, it took about a week to get it wired to all the power sources. It was an exciting time when turning on the power. I pulled all the breakers and pushed them in one at a time as I turned on each item. No smoke, and everything was lit up and running. What a relief.
Next item on the list was the gear fairings. I had placed the engine order and wanted to get the fairings done before it got here. The plane had to be raised to take the weight off the gear to set the fairing, which was also a lot easier with the engine off. I did not want the plane flying and these items left to do. A couple of weeks of fiddling with them and they were done.
Next was closing out the wings as they were being neglected over the past while. I had match-drilled them over the winter, but that was it. After lots of deburring, dimpling, and riveting, they were done in a couple of weeks. The wing tips then got cut and fitted, along with access panels installed for the tip tanks.
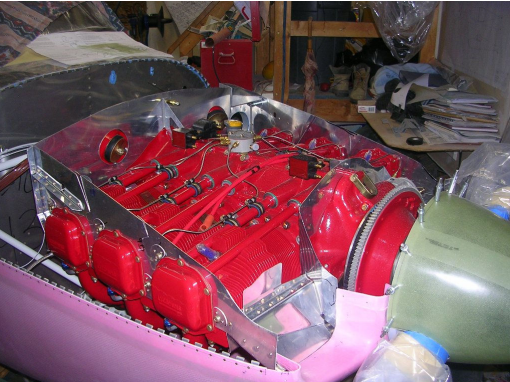
I soon got a phone call that the engine was ready… three weeks early at that!! I sent the check via Purolator, and the engine was shipped soon after. It is an Aerosport Power IO-540 260HP (fuel injected) with one magneto and one Plasma 3 electronic ignition. I got the sump heater installed for winter travel. The plane had been on the gear since May, so I was ready. So many people get very excited about the engine as they think they are making great progress. If the plane is just on the gear and the panel is not started, don’t get the engine. Leave it to the very last as it is a pile of money tied up that will not get put to use for a long time. The other item is that an engine sitting around for many years, even if it is pickled, is not the best choice. Keeping the install to run time as short as possible is the best choice, in my opinion, for a healthy engine.
I had built a dolly to support the engine before it arrived. I used an engine crane to get it off the truck and onto the dolly. That night, I installed all the fittings to the back of the engine, and the next day the engine was hung. I was a bit late getting the Hartzell constant speed blended airfoil prop as the engine was early. Sixteen weeks for the prop and you need it to do the cowling. It arrived 2 weeks after the engine. Again, planning makes all the difference. The next step was the cowling.
The cowling requires lots of putting on and taking off and a bit of luck to get it perfect. It seems that every next step changes the fit-up from the step before. Once it is all finished, the fit reverts back to when the fits looked good. It’s frustrating work, but it did turn out well.
The wings are taking up lots of space in the garage, so it was time to get them 100% done. The last step was fitting the wings to the fuselage. We rolled the plane out onto the front lawn for assembly. The wings slid right into place with little effort. Sure glad they fit!! A nice change to the kit was an alignment hole for the aft spar to fuselage connection. You simply cleco the aft spar in place and clamp it. I took out the smart level just to make sure. The angle was the same tenth of a degree for both wings. No fiddling around with plumb bobs, levels, and measuring tapes. A day job was turned into minutes.

The close-out fairing could then be fitted and match-drilled in place. That was soon done, and I was able to get into the cockpit via the sidestep and wings for the first time. It turned into Emma’s new place to play!! She could get in all by herself now. She was very proud!! The wings came back off that afternoon before the Chinook winds got too strong. The drilled holes got nut plates fitted to them, and the wings were deemed complete. It was now time to get the baffling done.
The baffling for the RV-10 is very well made. Vans designed the RV-10 around the IO-540, so everything fits. Very little cutting is required to match the profile of the engine. There is the same amount of work to get them cut down for clearance. They are very time-consuming, and patience is a must as you should only take off a little at a time. As of October 27, 2008, I just need to get the seals cut and placed to complete the baffle installation.
Things are soon coming to an end on the project. There is still a little bit of work left on the cowling before paint, and the engine exhaust and probes need to be installed. I have a bit of riveting on the empennage to close them out and a rudder trim to install. The door open warning lights have to go in and a bit of wiring for the trims to be complete. After that, it has to go to the airport. The wires get connected from the wings to the fuselage, and the final rigging will get completed. When I can’t find anything else to do, the next step will be to fly it. Sure, can’t wait for that day.
