
WOW, what a month!!! This has got to be the hottest September on record! I was able to get a couple of great flights in this month, including my first attempt at mountain flying.
I had decided to go for a nice Sunday morning flight but hadn’t decided where to go. The weather was looking great with no wind and mild temperatures. A quick peek at the weather sites also indicated similar conditions in the rocks as well. It looked like this might be the perfect morning for my first trip into the mountains! The closest I had gotten to mountain flying was the trip I took with Troy Branch last summer from Chestermere to Nelson, BC.

This was another perfect flight. I decided to head in through Canmore and follow the valley to Banff. Then I followed the Lake Minnewanka pass back out again. True, it was a short foray into the rocks, but I was awestruck! The morning was clear and there wasn’t so much as a bump until I got back to Carstairs. The cool air made the climb to 9500’ quite quick. I’ll definitely be trying this again… Maybe the Kananaskis Valley next time.
With September came my return to SAIT to study for my AME license. We’re deep into studying such things as turbine theory, aircraft pressurization, and electrical troubleshooting. We got a chance to run the school’s Bell 206 and will be running the Harvard in a month or so. The group I’m working with is deep into a 100-hour inspection on the Harvard.
Although I have had the chance to learn a number of skills while working on aircraft over the years, one skill I never had a chance to attempt was soldering. When I installed the radios in Chrissy, I had Canadian Avionics build the wiring harness for me so that all I had to do was install the pre-wired headphone jacks and hook up the power connections, one to the breaker and one to ground.
Fortunately, the SAIT AME course has a couple of classes that teach the basics of soldering. We started with simple wire-to-wire soldering and went on to cannon plugs last winter. This year we expanded on this and finished the class by building a magneto timing “Buzz Box.”
The kit is made by Ru Lon Aviation Marketing (www.buzzboxes.com) and was supplied by the school. The project was laid out in steps with a parts bag corresponding to each step. The project takes about three hours to complete for an amateur like myself. Some basic hand tools are required, as well as a soldering iron, preferably one with a controllable thermostat.
The basic steps are to stuff the printed circuit board (PCB) with the components, followed by adding the wires (speaker, battery connector, switch, and leads) and finishing up with mounting it all in the case.
Working on a project like this is a great way to gain the skills needed to do basic work on your own aircraft. Last week I bought a new Artex ME406 ELT for the Christavia. After reading through the instructions, I noticed that there is a wiring harness required between the ELT and panel switch. Normally, I would have gotten an avionics shop to build this. Instead, I’ll be tackling it myself this time.
Speaking of ELTs… YES, I have decided to bite the bullet and install a 406 ELT. After reading the Canada Gazette publication of the proposed new ELT regulations, it would appear that the best alternative for me was to go ahead and buy the 406. There are indications that there will be exemptions that may extend the compliance time once the rule goes into effect. However, there is nothing in the Gazette to indicate this. For complete Gazette wording, check http://canadagazette.gc.ca/partI/2008/20080809/html/re gle2-e.html.
Unfortunately, since COPA has been working so hard to amend the new 406 ELT regulations, there has been very little information out there for us Canadian owners who wish to avoid the whole controversy and just comply with the 406 ELT installation. To be fair, there could have been articles reviewing and comparing the various 406 ELTs available, as I don’t ALWAYS read COPA Flight cover to cover ☺. There was a brief listing of the available ELTs, but not much on how to install, test, and register your new ELT with the proper authorities.
Also, I’ve been quite concerned that since most folks have taken the “wait and see” attitude that COPA has been promoting, come February, there could be a huge shortage in available ELTs and manpower to install them. Personally, I’d just assume do it now and just keep flying.
This summer, I talked with the folks at the Kannad kiosk and was surprised to learn that the new breed of 406 ELTs are better than the old 121.5 ELTs. The Kannad representative was quick to point out that the 406 ELTs have better-designed G-switches and have a much longer endurance once activated due to a lower power draw and better batteries. He also rattled off a number of other improvements incorporated in the new ELTs to help increase survivability and chances of proper operation in the event of a crash.
There are also operational improvements. The new ELT I bought does not have an OFF position at all. The ELT only has an ON and ARM position. However, once the wiring harness is removed from the ELT, the ARM position automatically deactivates, making it safe to ship.
Another new feature of the 406 ELTs is the requirement for a speaker to be installed to give an audible warning when the ELT is activated. This makes it nearly impossible to walk away from the aircraft with the ELT activated.
Finally, since the SAR folks are promoting the 406 ELT as the best solution and COPA is promoting the SPOT (or similar) device, I figured the best way to ensure my butt is found in the event of a crash is to have BOTH devices. To be honest, even if the new ELT increases my chance of surviving a crash by only 1%, then cost is trivial in my mind!
Don’t misunderstand me here… I applaud COPA’s efforts to allow for other cost-effective technologies to be employed in place of ELTs. For some of us with non-certified aircraft (amateur-built and owner-maintained aircraft), the cost of installing a 406 ELT is not that great since it can be done by the owner and an AME sign-off is not required.
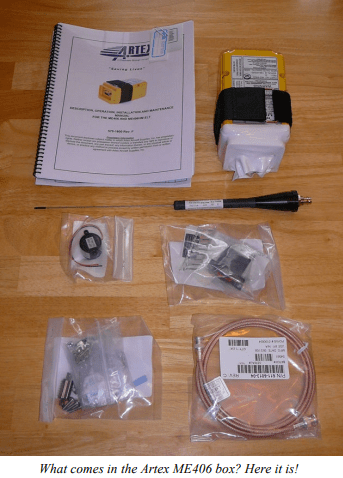
Getting back to the Artex ELT, I decided on the Artex ME406 primarily because it was the choice of the avionics shops I talked with and was locally available through Aviall for $1099. The kit I bought was the Artex part number 455-6605 and includes the ELT, battery, ELT mount, remote switch, antenna, antenna cable, and all the parts to build the wiring harness except the wire itself. I bought a reel of two-wire (#22), shielded cable for $75.
I plan on installing it next week and will include an article on the installation, testing, and paperwork in next month’s newsletter.
Before I close, I would like to make a request for new articles and photos. At this point, I have no articles for next month’s issue and had very little for this issue until the last moment. After all, I’m sure you guys are tired of my ramblings…☺
Also, I’d like to mention that a number of us meet at Swiss Chalet on Edmonton Trail and McKnight at around 5:30 PM before the meetings. Feel free to join us if you’re available. See you all on Thursday!
