
June is finally upon us. Hopefully, it will produce more favorable flying conditions than last month. It seemed that whenever I was available to commit to aviation, the weather had other ideas. This, coupled with a trip to Las Vegas, a visit from my parents, and spending my weekdays here at the lake, has conspired to keep me out of the air.
Another factor was at play this month. About a year ago, I purchased a set of coil spring gear legs to replace the bungee ones on Chrissy. The current bungee cords seem to need replacing every two years or so as they sit in the direct blast of the exhaust. Even with covers, exhaust gases and oil have been working their way in.
The coil springs would provide a maintenance-free solution to the problem that would hopefully be lighter and more streamlined than the current setup. The kit was purchased from Wag Aero (Part Number M-222-100, $256.75) and is designed for use on their Sport Trainer and 2+2 aircraft. Given the similar geometry and design of the gear, it appeared that it would be adequate for the Christavia.
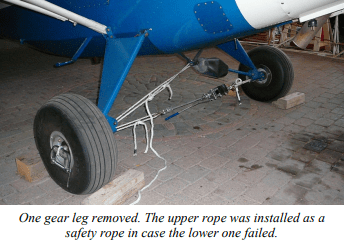
Work started by first removing one of the gear legs from Chrissy to use as a guide. I find that the easiest way to do this is to use a come-along between the axles to release the tension on the shock strut, then remove them one at a time. There must always be one shock strut in place at any given time, or the landing gear will collapse.
One issue I found is that the tubes used in the Wag kit were 1/8” larger in diameter than called for on the Christavia. At the axle end, this wasn’t an issue as the mounts were 1-1/4” apart and the tube was 1”. However, at the upper end, the mount was only ¾” wide, and the tube was 7/8”. I decided that the easiest way to accommodate this was to slide a ¾” tube into the 7/8” member. This also allowed for simplified fitting of the member to the plane. I completed both ends of the strut and then slid them together while on the plane in the correct position, then drilled and bolted the pair together to form one strut. The bolt could hold the legs together until I could weld them back in the shop.

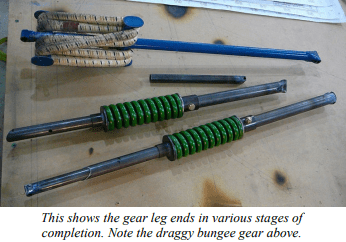
Prior to that, the four ends were prepared by drilling a hole in each to accept the 5/16” bushing stock and then wrapped with plate to finish the ends. I was surprised to find that everything fit perfectly on the plane when I went to drill and bolt the struts together.
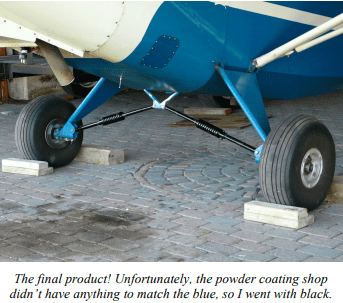
Once fully assembled, the gear was sent out for powder coating. They did a great job, but it did cost $75.00. Of course, the last step was the paperwork. In this case, an entry was made citing AC41.30-1B as the authority, and a new weight and balance was created.
The total cost to swap the gear was $331.75, and it took approximately 10 hours (not including several trips to the hangar).
Obviously, the maintenance-free objective was met, as the coil springs should have no problem with exhaust gases or oil wearing them out. I did notice that one wingtip is about 1” lower than before. However, I’m not sure that the plane was perfectly level to begin with. Certainly, it’s not something I’m going to worry about.
Unfortunately, the gear came out a bit heavier than the original by 2.5 lbs. This I can live with. As for being more streamlined, time will tell. I have yet to fly the plane with the new gear. I’ll be sure to follow up next month with a flight report.
