There are a number of ways to build an aircraft fuselage: wood, aluminum monocoque and semi-monocoque, aluminum tubing, and, the subject of this article, steel tube.

In fact, there are two types of steel tube fuselages, the Pratt Truss and Warren Truss. The Pratt Truss uses tubing for the longerons (long, fore/aft members that form the corners of the fuselage) and cross members. However, the diagonals are formed using cables in tension. A number of aircraft used this method between WW I and WW II.
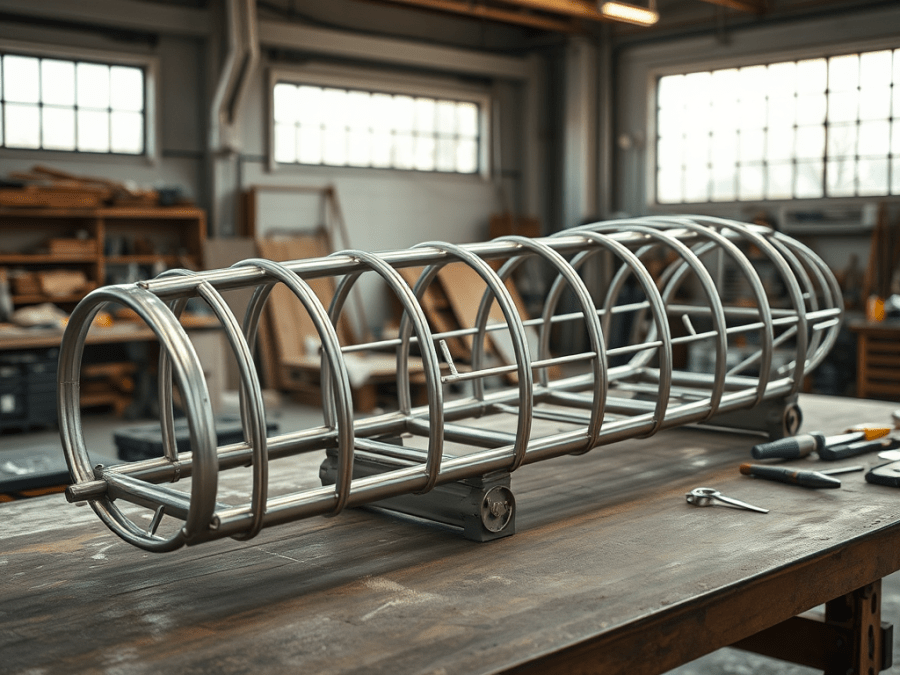
Most modern steel tube fuselages use the more familiar Warren Truss. In this design, all the members are formed by steel tubing, which is capable of withstanding forces both in tension and compression.
Regardless of the method, there are a number of basics required in building a tube fuselage. Most plans will come with drawings that show the fuselage structure in profile as well as from the top and bottom. These will be the starting point of the fuselage construction.
Once you have looked over the drawings, you can determine the size of workbench you will need. In my case, the Buttercup required a 16’ x 4’ table. To ensure I could reach the top of the fuselage, I made the table about 30” high, a bit lower than I normally like. With a nice, level working surface, I laid out the fuselage profile on the tabletop by lofting the tubing centerlines at full scale.
The drawings typically give dimensions using the centerlines of the tubing only. Be sure to accommodate for the tubing diameter when laying out the fuselage.
Starting with the longerons, tubing is bent to match the centerlines. Small wood blocks are used on either side of the tube to position the longerons in place over centerlines.
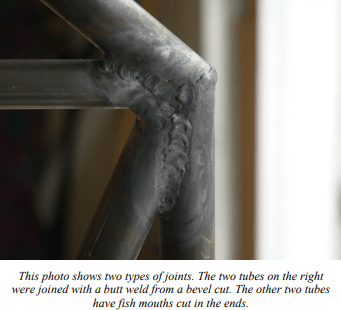
Now you’re ready to start your first joints (no, not those joints). There are three basic ways to form a joint. First, at the outside corners, a simple bevel cut can be made at the ends of the two tubes and a butt weld can be performed.
In some cases, you’ll have a requirement to reduce the diameter of the tubing such as along the longerons. In this case, a smaller diameter tubing is slid into a larger diameter one and welded where they overlap. To increase the strength of the weld, the larger tubing is typically cut at a 45° angle. In addition, holes can be drilled in the outer tube along the overlap and welded in what’s called a rosette weld.
Finally, the most common joint is a fish-mouth joint, where the end of one tube is cut to match the profile of the other tubing it intersects. There are several methods to make this cut, but the one thing they all have in common is that there will be a bit of trial and error in making the tubes fit right.
The simplest method is to cut the tubing to close to the right size, then file the end to match the other tubing. Cutting can be done using a hacksaw, metal bandsaw, pipe cutter, plasma cutter, or my favorite, the cut-off wheel. Forming the fish-mouth end can be done with a file or die grinder, a bench grinder with the wheel dressed out to a round edge (use a wheel dresser for this), or a tube notcher. Tube notchers, like the “Ol’ Joint Jigger,” typically attach to a drill press using a clamp to hold the tube and a hole saw to cut the end to shape. The hole saws come in numerous sizes to match the tube sizes. The tube clamp allows the tubing to be set at whatever angle you need.
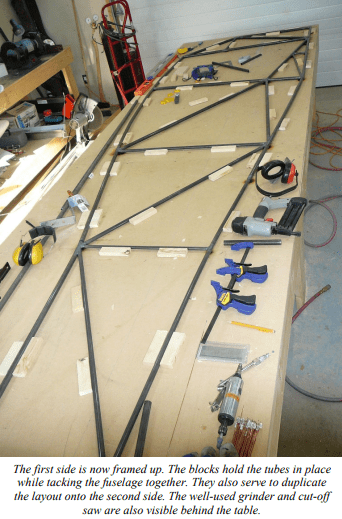
Once the tubes are cut to the right shape, they can be tacked in place. I find that using a small steel plate under the joint as I tack the joint prevents the table from getting too badly burned. Be sure to use blocks to position each of the tubes in place as you go since they will be used to build the opposite side to match the first side.
Once you’ve finished the first side, use the jig you’ve created to build the second side. Be sure to check for differences between the two sides. For example, one side may have a door but not the other.
With both sides tacked together, it’s time to stand them up and weld them together. Usually, there will be a section of the fuselage where the sides are parallel. On the Buttercup, this was within the cabin area. I built up two vertical frames to support the sides on top of the table. Once I was sure everything was square and straight, I welded in the cross members between the sides.
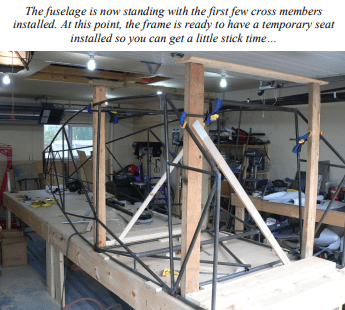
Once this is complete, you can bend the sides back using heat to help form the bends. The rest of the cross members and diagonals can be installed between the sides. Be sure to continue checking that everything remains straight and square.
Now comes the best part. Throw in a crate approximately the height of the seat and sit yourself down in your newly minted airplane fuselage! Be sure to clean the drool off the tubing from making all those engine noises!
Once you have completed tacking up the fuselage, it’s time to move on to finish welding and installing fittings, but that’s for a later article.
By the way, the time required to get to this point is about 40 hours. This is definitely a project with significant visual progress and one that’s very satisfying!

wwhy not use square section tubing [more surface area ] plus easier
LikeLike
With round tubing the stresses are equally distributed at all angles. When using square tubing the stresses become concentrated in the corners and that allows small cracks to form over time.
LikeLike