Well, it’s 2007, and time for new resolutions. I have a couple. Of course, the old stand-by to lose weight, exercise more, and eat healthy is at the top of the list, but here are a couple more:
I promise to start NO NEW PROJECTS this year. Between home renovations and building a cabin, plus my various aviation projects, I never find time to finish anything!
I vow that I will finish that blasted Commercial License by June. There are a lot of excuses why I haven’t finished (my instructor left, no ground school available, cabin work got in the way, etc.), but basically, I’ve been procrastinating. This winter, it will be a top priority!
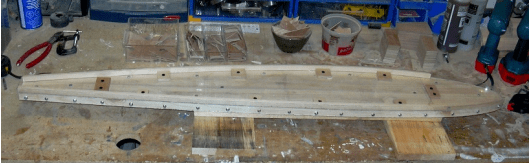
I resolve to get the Buttercup going. I’ve been too busy with other chores to get started on the plane. The parts kit has been sitting in my garage for nearly two years, and all I’ve accomplished is getting the wing rib jig started. The ribs will definitely be finished this winter, and I want to see the fuselage on its gear by the end of the year!
Fortunately, things are progressing well in this last area. I’ve been working on the wing ribs quite a bit and came upon an interesting way to build the jig. I was poking around the Hatz biplane site and came across a short article on building wing ribs by Doug MacBeth. They were using what they had termed the “High-Tech Wing Rib Jig.” Hmm… that sounds interesting!
The principle behind the jig is quite simple. T-88 structural epoxy will not stick to “polyethylene, polypropylene, Teflon, or other waxy materials.” What does this mean for us builders? Well, if you build the jig using acrylic materials, there should be no need to use wax paper to release your ribs.
There are several variations on how to do this, but what I chose to do is to cut my jig from ¾” pine shelf board, the type built up from ¾” x ¾” strips, and laminate an acrylic sheet to the working surface.
I laminated the drawing of the wing rib to the top of the board and then carefully cut the profile out using the band saw. The final shape was obtained using a disk sander to smooth the edge down to the line. A rough cut sheet of acrylic was screwed to the jig and trimmed to shape using a Dremel router with a tracing bit.
Before going further, I used the flat jig as a template to cut the plywood doublers needed to build the ribs. These included eight full-length doublers to sandwich the four end ribs, as well as the small gussets on the rest of the ribs. The Buttercup also has one rib that’s smaller than the rest at the wing root. Since the rear half of this rib is the same as the rest, I cut out a ¾” pine board for this rib as well, using the other jig as a template. Those ribs will need to wait until the fuselage is done.
With these bits done, it was time to finish the rib jig. The cap strips for the Buttercup are ½” wide, so I cut two 1/8” acrylic strips 1-¼” wide and the length of the rib. These were screwed vertically to the ¾” board along the top and bottom edges to hold the cap strips in place.
A piece of 2×4 was screwed to the bottom of the jig so that clamps could be used around the edge of the jig to hold the gussets in place. This eliminates the need to use nails in the wing rib.
Finally, blocks were cut and applied to the jig to hold the various cap strips and truss members in place until the gussets were applied. I used a couple of small blocks cut from the wing spar blanks to ensure that the spar openings were the proper size. As with any wing rib jig, the most crucial measurement is the distance from spar center to spar center. I plan to use a completed wing rib to set up the jig for the smaller inboard wing rib to ensure that the spar spacing is equal throughout.
Now comes the tedious task of cutting the remaining material to build the ribs – 584 pieces in total! I plan to set up a production line so that when it comes time to build the ribs, I just need to glue and clamp the appropriate parts in the right place. I hope to be able to turn out one rib per evening. If all goes well, this will put me back on track to finish the ribs this spring!