
Five years ago, I never thought I’d be buying an aircraft radio. In fact, one of the greatest appeals of ultralight flight was the freedom of restrictions. Pure and simple recreational flying, uncluttered by the restrictions, procedures, and clearances that go with heavier machines. At that time, I did most of my flying some 50 miles northwest of Calgary; I’d forgotten what a control zone was. Aeroplanes of any kind were rare in the area and I was always welcomed as a novelty if I dropped in on some lonesome farmer. I was a little bird in a big sky. Hell, I was the local entertainment to porch dwellers of the area. Then I moved to the Priddis area, some 15 miles west of Calgary; some other space cadet now entertains the locals – fame is a fleeting thing. Along with the move, I became a little bird in a little sky.
The intensity of air traffic bears a direct relationship to the proximity of Calgary. A lot of things appear to be drawn into the influence of the city – just like a magnet. You can tell You’re getting close to a city just by the frequency of signs, towns, villages, and improved roads… even 30 miles out. Contrast this with the area 30 miles around Bassano, or some other rural Alberta town.
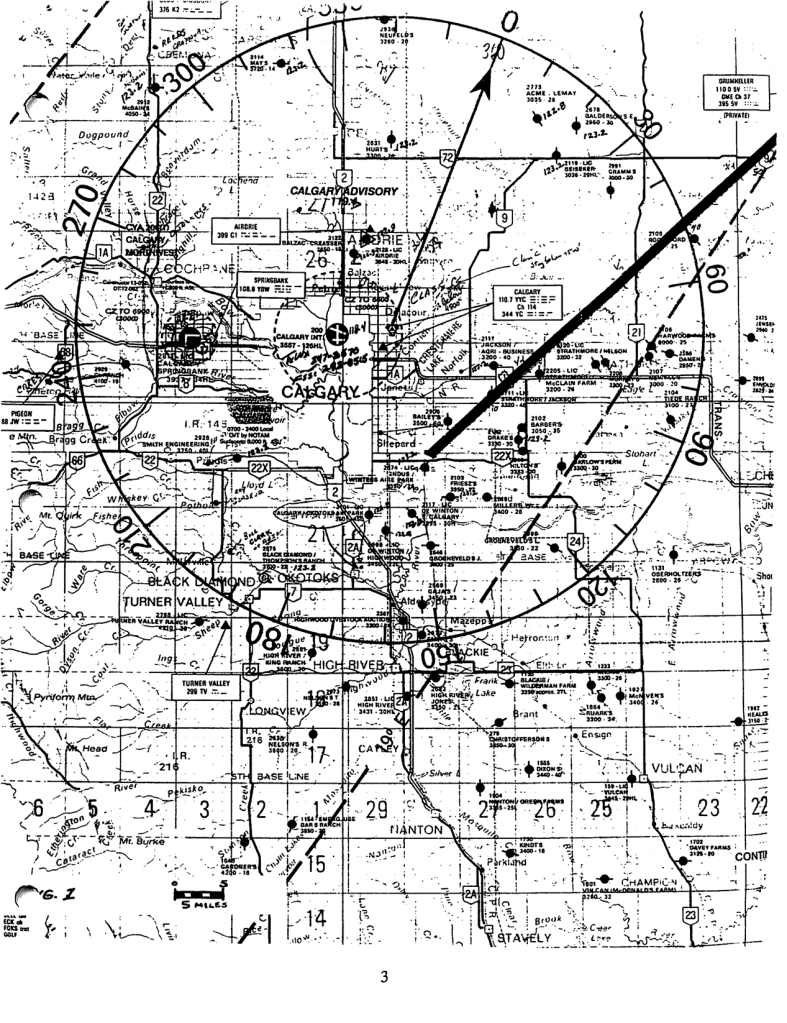
Figure 1 is a map of the Calgary area. Progress has made its mark. Within 30 miles of Calgary are more than 50 airports/aerodromes. Not to mention the unshown strips. All of this within an area of 2,500 square miles. Note the city covers more than 200 square miles and the Calgary control zone is 100 miles. Note also, the restricted area on the Sarcee Reserve, and the “ALERT” or training area north of Cochrane.
We would all like to keep our flying simple and basic – the primary tenants underlying our mode of flight. But the times are changing.
The new regulations (September 7, 1989) will certainly hatch a newer, faster, heavier, more sophisticated machine. There will be more demand on controlled/uncontrolled airports. As it is now, it’s difficult to fly around the Calgary area without encountering a control zone or heavy weekend traffic. The big sky theory keeps collisions from occurring, until the time comes when all the birds want to return to the roost; the big sky quickly becomes crowded. Most of us fly around low, slow and solo, avoiding controlled/uncontrolled airports so that we don’t create a hazard for ourselves or others. I envy those who have lots of open space and light traffic. For those who fly in high traffic areas, an additional safety edge might be radio. The wave of the future will involve radio communication. Remember though, that radios can’t see and the best collision avoidance equipment lies between your ears. Never neglect looking around for traffic.
Catching the Wave
Progress and safety are gradually creating more sophistication in all things. Radio communication is an added safety feature for those who want to get safely in or out of many places in the Calgary area. But radio doesn’t come cheaply. Still, it’s as cheap now as it’s ever been. If your kind of flying is away from the mainstream, great, I envy you. You will get along fine without a radio; however; for those who have to share the sky with others, you might want to consider the cost/benefit of radio.
Here’s five reasons to convince Santa why you might want to get into radio (notice I said “want,” not “must”):
- Contacting a control tower to get permission (clearance) to land/take-off, taxi or fly near/through a control zone.
- Announcing your intentions at uncontrolled aerodromes or conversely, listening to the intentions of others.
- Getting inflight weather from a nearby ATIS.
- Listening in to get an idea of the air traffic in a particular area.
- Monitoring the FSS frequency to receive PIREPS, SIGMETS, etc.
Compulsive “knob twirlers” and “button-pushers” will like the new breed of VHF hand-held transceivers. Most of them come with rechargeable battery packs that will last six to eight hours in the receive mode.
If your’re going somewhere with a group, it’s O.K. for the flight leader to announce your collective arrival and intentions -i.e., one radio is enough. You simply have to follow the leader. Do what he does – unless he crashes! If so,- simply land gracefully alongside and hope his ‘radio has been thrown clear. For those who like to have control over their own machine, it can set you back close to $1,000 to be wired. Handheld transceivers run in the $500 – 600 range, then the headset/helmet units are another $250- 300. Add to this an antenna ($40) and push-to-talk patch cord ($40), plus the shielding hardware and license fees ($35). And this is before the 9% goods and services tax.
At last month’s meeting, Bob Kirkby enlightened us about the nuts and bolts radio installation and shielding to decrease noise (N) and increase signal (5), to improve the S/N ratio. Here is a brief summary of Bob’s key ideas about shielding:
- Ground engine to airframe, using a short piece of wire attached to some non-structural bolt. Your lord mounts likely keep the engine insulated from the airframe.
- Install resistor plug caps – for Rotax it’s part No. LB5OEZ. Resistor plugs are not recommended.
- Cover the plug leads with a wire braid and ground at both ends. This wire braid is available through Bob at $2 per foot. You will need about 3 feet to do the job.
- Mount antenna and “ground-plane” for the antenna in a suitable location. One wavelength is about 8.2 feet, so a quarter-wave antenna is about 2.0 feet.
- Use a coax cable to connect the antenna to the radio. The optimum length of coax should be an even multiple of the “typical” wavelength used:
w = c/f
where:
- w = wavelength
- c = speed of propagation of radio waves which is 186,000 mile per second.
- f = mid-point of VHF frequency spectrum or 120,000,000 cycles per second (120 MHz).
Therefore, wavelength, in feet, is:
w = 186,000 mi/sec x 5280 ft/mile / 120,000,000 cycles/sec
Cancelling the units gives:
w = 8.2 feet/cycle (i.e. wavelength = 8.2 feet).
Hence, your antenna lead should be 8.2 feet or 16.4 feet, and so on.
- Consider shielding the coils if there’s still too much static.
Several club members have already installed radios and done the shielding on Various types of aircraft. So, when it comes time to do yours, ask around for advice. I’ve enclosed some information which I obtained from one avionics company, to which I’ve added some notes. Bon reception!
Push to Talk (PTT)
Getting your radio installed and working properly is one thing. The other thing is getting yourself working properly. You will require a radio operator’s license and a license to install and operate a VHF aircraft radio station. A good way to make the ultralight community seem like a bunch of amateurs, unsafe at any altitude, would be to skip the above licenses. To ensure you become known as the “Radio Operator from Hell,” simply use CB lingo, cut people off in the circuit, broadcast with a motor mouth, step on other transmissions, use non-standard phraseology, speak rapidly, and acknowledge nothing! Clearly, there is more we need to know than how to activate the push-to-talk switch to sound professional. There are two ways to learn; one is reading, and the other is listening – which is the same as reading with your ears instead of your eyes. That’s why someone invented cassette-style books.
Reading to Talk
You need two licenses to operate your radio. To get your radio operator’s license, you will be required to pass a test. These are given orally at most flight training schools for a minimal charge. A CFI will ask you questions about regulations, procedures, and emergency communications. To prepare for this test, you will need to spend a few nights studying. The most common reference studied is a booklet from Communications Canada (DOC) called the “Radio-Telephone Operators Handbook.” It costs $1.75 and is available at most flight schools. Study up a bit, then simply make an appointment at the place of your choice to get the test administered. You will get a temporary license after the test and a formal paper from the DOC in a few weeks.
The second license required is the radio station license for your aircraft radio station. This is obtained from the DOC on the 8th floor of the Federal building in Calgary. There is a fee of $35 per year. Basically, all you have to do is supply them with information, such as the make and model of the radio, frequency band, aircraft registration, etc.
Listening In/Listen Up
Reading about radio procedure is one thing, doing it, is another. I think one of the best ways to learn is to listen in. Simply tune in to a controlled airport and monitor the conversations between the pilot and controller – just don’t try transmitting yet. Monitor the communications and listen for content, intent, and acknowledgments. At first, it will sound like gibberish, like some codes – not to worry, it is a code. After you’ve listened for a while, all makes sense. It will make sense because there are certain procedures to use and you will begin to anticipate the reporting out of a pilot and the clearances and instructions of the controller. Soon you will hear pilots making mistakes and omitting information. This is a good sign – it shows you’re learning what should be said when it’s said, how it’s said, and why.
There is a lot more to know. Next month I will summarize the procedures for sending or receiving a message; the proper procedures at controlled and uncontrolled aerodromes and some tips on effective use of the radio, all in the spirit of safety and professionalism.
Fly safe.
