It’s easy to navigate an airplane! That’s what some people think. After all, you’re up high where you can see everything so much better, so there shouldn’t be any excuse for getting lost! In fact, when it comes down to it, the opposite is true. It’s easy to get lost while flying, or at least become disoriented. If it hasn’t happened to YOU yet, it will. Just go over some unfamiliar terrain without adequate preparation and watch your anxiety level grow as your fuel level shrinks.
Why should it be so easy to get lost while flying? True, you’re up high and can see a lot more, but this adds to your problems. Your lofty perch allows you to take in a lot more landscape; suddenly, every familiar landmark takes on a new shape. The road down there that you thought ran north-south actually trends at some angle. One farm looks like another. Hills and valleys aren’t so obvious. Some things look foreshortened. Your visual senses are overwhelmed with so much new information.
This article will relate some tips to safely navigate your airplane on short cross-country trips. Getting lost is not the problem; it’s how you react to this feeling. Don’t panic. You likely know your approximate position — it’s just that you don’t know exactly where you are. In piloting, knowing approximately where you are is often good enough, but sometimes you need to know your exact location — for example if you’re trying to locate an unfamiliar airstrip. Knowing your approximate position is adequate 95% of the time. The purpose of your cross-country trip is often for no other reason than pleasure. It’s hard to enjoy your flight if you’re all pumped up about keeping track of your exact position every single second. A tense pilot concentrating on his exact position is likely to forget some other things requiring his attention, for example, altitude control, other traffic, gauges, and fuel level, forced landing sites; fixating” on one part of your duties as a pilot in command will get you into trouble. The cross-country trip can be a pleasure if the following steps are taken:
- preparation;
- en route checks.
Should I? Shouldn’t I?
Our initial flying often consists of doing circuits at our home strip. The space is well defined, and we are always within sight of the runway. You get into the habit of turning over the same landmarks and judging your final approach by the height and location of well-known features. Eventually, this gets boring, and the urge to go further in space takes hold. Maybe it’s a flight to a nearby strip; maybe it’s a flight over a friend’s house; maybe it’s peer pressure to go somewhere else and be somebody.
Whatever the reason, there is probably a nagging doubt in your mind about doing this. Don’t worry, it’s your common sense working. You are probably uncertain about this because it’s not taught properly. Somehow, you’re supposed to just know how and do it. No wonder you’re torn between going and not going—the uncertainty of having to go about it can leave you paralyzed. Then when you do screw up enough courage to attempt it, things seem to go wrong right from the start. Maybe by trial and error, you will succeed, eventually, in flying cross-country. But it doesn’t have to be this way.
This article attempts to unravel some of the tricks of navigating your airplane without resorting to complex terminology and instrumentation. Even transport pilots keep track of their position by looking at the ground below; it gives them (and me) some comfort to know that they are where their instruments tell them they are. It’s not sufficient to know that you’re 341.515 miles from the destination, or one hour, 17 minutes, and 11 seconds out on a bearing of 315.43 degrees at 30,007 feet. The digital display is great, but it’s even greater when you ground-truth it.
Basically, navigation consists of two basic steps:
- preparation;
- en route checks.
Preparation
The Air Canada pilot who successfully force-landed a large passenger jet at an old unused strip near Gimli, Manitoba, some years ago, exemplifies how preparation and knowledge can pay off. It wasn’t luck; it was just lucky for the passengers that they had such an astute pilot! With the ‘flameout’ at 30,000 feet due to fuel starvation, he had to make some quick decisions about what to do; it’s not an everyday occurrence. He wasn’t lost, but preparation for his cross-Canada trip and en-route checks allowed him to take a definite course of action that led to a successful landing. His professional attitude and mindset were developed from years of experience and visualizing (maybe even dreaming) of just what he would do in such a circumstance. This kind of thinking ahead about contingent actions one might take typifies the way the old pilot thinks. I’m willing to bet it started years ago when he flew aircraft with less reliable motors.
The point of this story is the importance of preparation before any flight. There is a lot more to preparation than a thorough preflight check. Most cross-country flights will require some form of navigation and may entail an ‘out landing’ at an unfamiliar airstrip.
Navigation is nothing more than the ability to read a map and relate it to what you see and vice-versa. Practice makes you sharper. Navigation starts with preparing for the flight. You begin to envision the flight, the contingencies to prepare for, and what preventative action to take. Decisions can be made on the ground about all kinds of things and result in a less cluttered mind en route.
Preparation involves a number of things including:
- map;
- weather check;
- flight plan or notice.
Let’s take these one at a time it’s only short list.
The Map, Please!
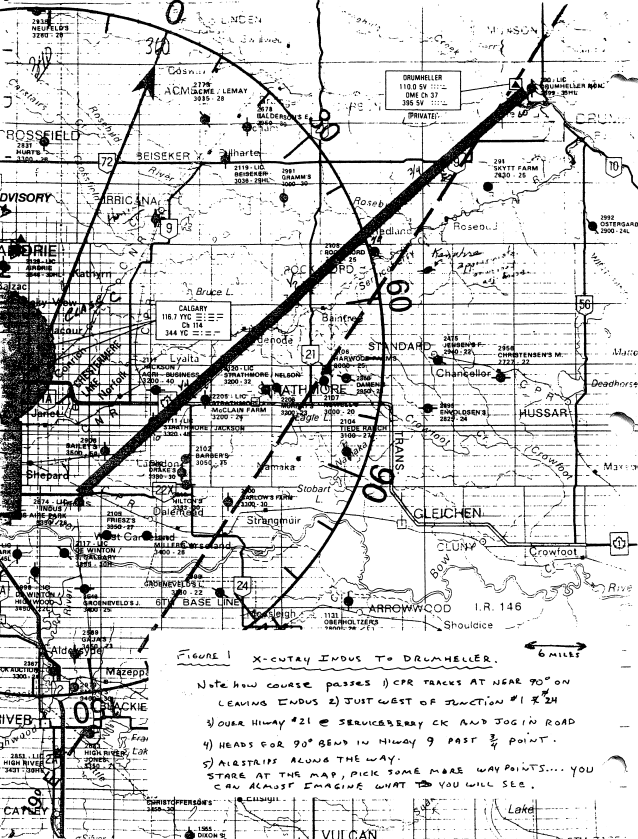
This is the first step in preparing for the flight. If you’re going to be following highways, a road map might be adequate, but for true, cross-country air maps, something more detailed like the Alberta Aviation Council map is good (Figure 1). It shows the location of a lot of private strips and other pertinent information. But it doesn’t show many of the roads and such – 1 use both. Locate your destination and starting point and draw a straight line between them. Mark the line off in 10-mile increments with heavy marks at the .25, .50, and .75 waypoints. Study the map (Figure 1) and try to visualize the landmarks along the way. What towns might you see? Railroads? Highways? Lakes? Streams? What’s the round trip distance in miles, and in time? Will additional fuel be required? What are the alternate strips along the way to which you could divert? What information do you have on your landing site at the destination? What’s the heading if you’re going to use your compass? What will be your altitude? What’s the terrain like? It might seem like a lot of questions, but you will feel more in control if you take a few minutes to get the answers first. When landmarks show up, pretty much as you have envisioned them, at the right place and the right time, you will welcome them like old friends. Your satisfaction and confidence will grow. Study the map of Figure 1 to visualize which landmarks you might line up with to keep your course and which landmarks will pass by on your left and right sides. With a little thought, you can almost see the junction of Highway 21 and the Trans-Canada. Note how you parallel Rosebud Creek.
As your skill grows in cross-country flights, you will develop some tricks of your own — like keeping the relative position of the sun approximately the same to hold a heading, lining up with a distant point to keep straight, or recognizing a stream by its winding, sinuous course with tree- and shrub-lined banks, since it’s unlikely you will see any water until almost overhead, or gluing a digital clock onto your panel and estimating the time to the next landmark or your ETA. These mental games never end and are part of the pleasure of flying VFR.
The Weather, Please!
Once you’ve planned the flight, the next step is to get some guidelines on the kind of weather to expect. The weather in Alberta is often unstable and changes quickly. If everything looks O.K. as far as the eye can see, you’re probably okay for a few hours. What you see is what you get! Maybe, you’re planning on going out in the cool of the morning and returning in the cool of the evening. Things could dramatically change in 10 hours. A check with your local flight service center, declaring your intentions, and getting information on what they expect, will help you plan accordingly. For example, the. phone conversation might go something like this:
Pilot: “Hi, I’m planning on flying my ultralight from Indus to Drumheller this morning and returning in the late afternoon. What can I expect in the way of winds?”
Flight Service: “Well, let’s see now, uh (silence as he stares at maps and reports), uh, right now we’ve got winds 270 at 10, and (more silence) an upper cold front moving south from Edmonton, so we forecast some showers and local thunderstorms in the afternoon with winds switching to 340 at 20, but things should dissipate by evening.”
Pilot: “Oh, thunderstorms, eh? I can’t take winds more than about 15 mph, but you think things might get better as it cools off in the late afternoon, eh?”
Flight Service: “Well, we expect instability as the thunderstorms build, but they usually dissipate as the sun goes down. It looks like things will pretty much be the same today as they were yesterday.”
Pilot: “Oh, I see, O.K., thanks a lot.” (You think about yesterday’s weather.)
The flight service people cannot and will not make your decision for you. It’s your decision. If you decide to go, at least you know what to expect. This is good information. If you see the storms building, you can decide to beat them home, or wait them out and fly home after they’ve passed. Take their information as a guideline in preparation for your flight. You can compare the ‘forecast’ to ‘actual’ •along the way. With the current and forecast winds, you can predict how much headwind, tailwind, or drift wind to expect, as well as the degree of mechanical and convective turbulence. Good stuff to know!
Who Knows About You? Who Cares?
Once you’ve decided to go, it’s a good idea to let someone know your approximate course, time of arrival and return, and other pertinent information. In fact, it’s required if the flight is more than 25 nautical miles from your home base — it’s your duty. The simplest way is to inform some responsible friend of your intentions and check in with him later. If you’re overdue, he can/will/should go to the appropriate authorities to take some action once you’re overdue by a certain number of hours.
En Route
Half of Being Smart is Knowing What You’re Dumb At
Pilot navigation is simply map reading. Relating what you see on the ground with what’s on the map. With proper preparation, you know what to expect; you’ve related what the map shows to what you expect to see.
I like to keep the map in the cockpit oriented with the longitudinal axis of the aircraft so that if I am going north, the top of the map is to the north; if I’m going south, the top, or leading edge of the map, is south. This way, I don’t have to do the gymnastics of mentally turning things through so many degrees. I follow along my flight path, checking the landmarks along the way. If you can, look ahead, aside, and behind to keep yourself on course. Reorient yourself with upcoming and passing landmarks to help you ‘stay on course’. Keeping track of drift allows you to make the appropriate corrections. Keep one eye on the weather too. If it seems prudent to do a 180, do it, or divert to a previously chosen alternate location to think things over.
While the approximate position is adequate for most cross-country flights, the real test is finding an unfamiliar airport. In this case, an exact position is needed. It’s not easy to spot an airstrip that you’ve never used, but if you know your approximate position and what to look for, it’s easier. With your preparation, you know the length, width, and orientation of the strip. Look for a darker patch of grass oriented in the same fashion. Other airplanes? Now locate the position of the windsock, if available, otherwise determine wind direction from whatever clues are available. Plan your approach. The standard circuit at uncontrolled strips is left-hand. Do a practice run and plan to overshoot and go around if everything doesn’t look just right. No rule says you have to land on the first attempt. Once you’ve landed, check yourself out and think about the return flight. Congratulate yourself on getting there – you know you can get back. Prepare for the return flight in the same way that you planned the first leg. It only takes a few minutes, while things are fresh in your mind. Things will look different with a different sun angle on the return heading.
Summary
Essentially, successful navigation depends on two things:
- adequate preparation;
- en route checks
If you become disoriented momentarily, don’t panic – simply maintain your heading and it’s likely some identifiable landmark will appear. Mentally retrace the flight to the last known position. If you keep track of time and distance covered, it’s unlikely that you’re lost in space – just temporarily disoriented. If nothing identifiable shows up in a while and you’re low on fuel, then a precautionary landing might be in order. The precautionary landing will be the subject of future articles. For now, it’s sufficient to include it in your list of contingencies when planning a cross-country flight.
P.S. Don’t forget to pack a few extras — like your tools pouch, spare plugs and oil, tie-down rope (dog stakes are good), a few chocolate bars, maybe a thermos of coffee, pencil and paper, and your maps. A few quarters for a pay phone and dollars for extra gas. Your logbook and license. Anything more than this and you’d begin to look like a tourist with two pieces of checked baggage!
The main thing is to have fun. Don’t push too far on your first few cross-country trips. Once you’ve done a few trips successfully, it’s unlikely you will be content to practice circuits. Enjoy!
Fly safe!
